The 7 OpenClaw Install Pitfalls That Kill 60% of First Installs
Node 22.14+ wall, WSL2 permissions, Docker RAM, whitespace in API keys, gateway port 18789. Seven OpenClaw install pitfalls in order with copy-paste fixes.
>This covers the install pitfalls. Build AI Agents That Get Paid walks through the full OpenClaw + Hermes + MCP stack and the consulting playbook that sells it for $3K-$10K.
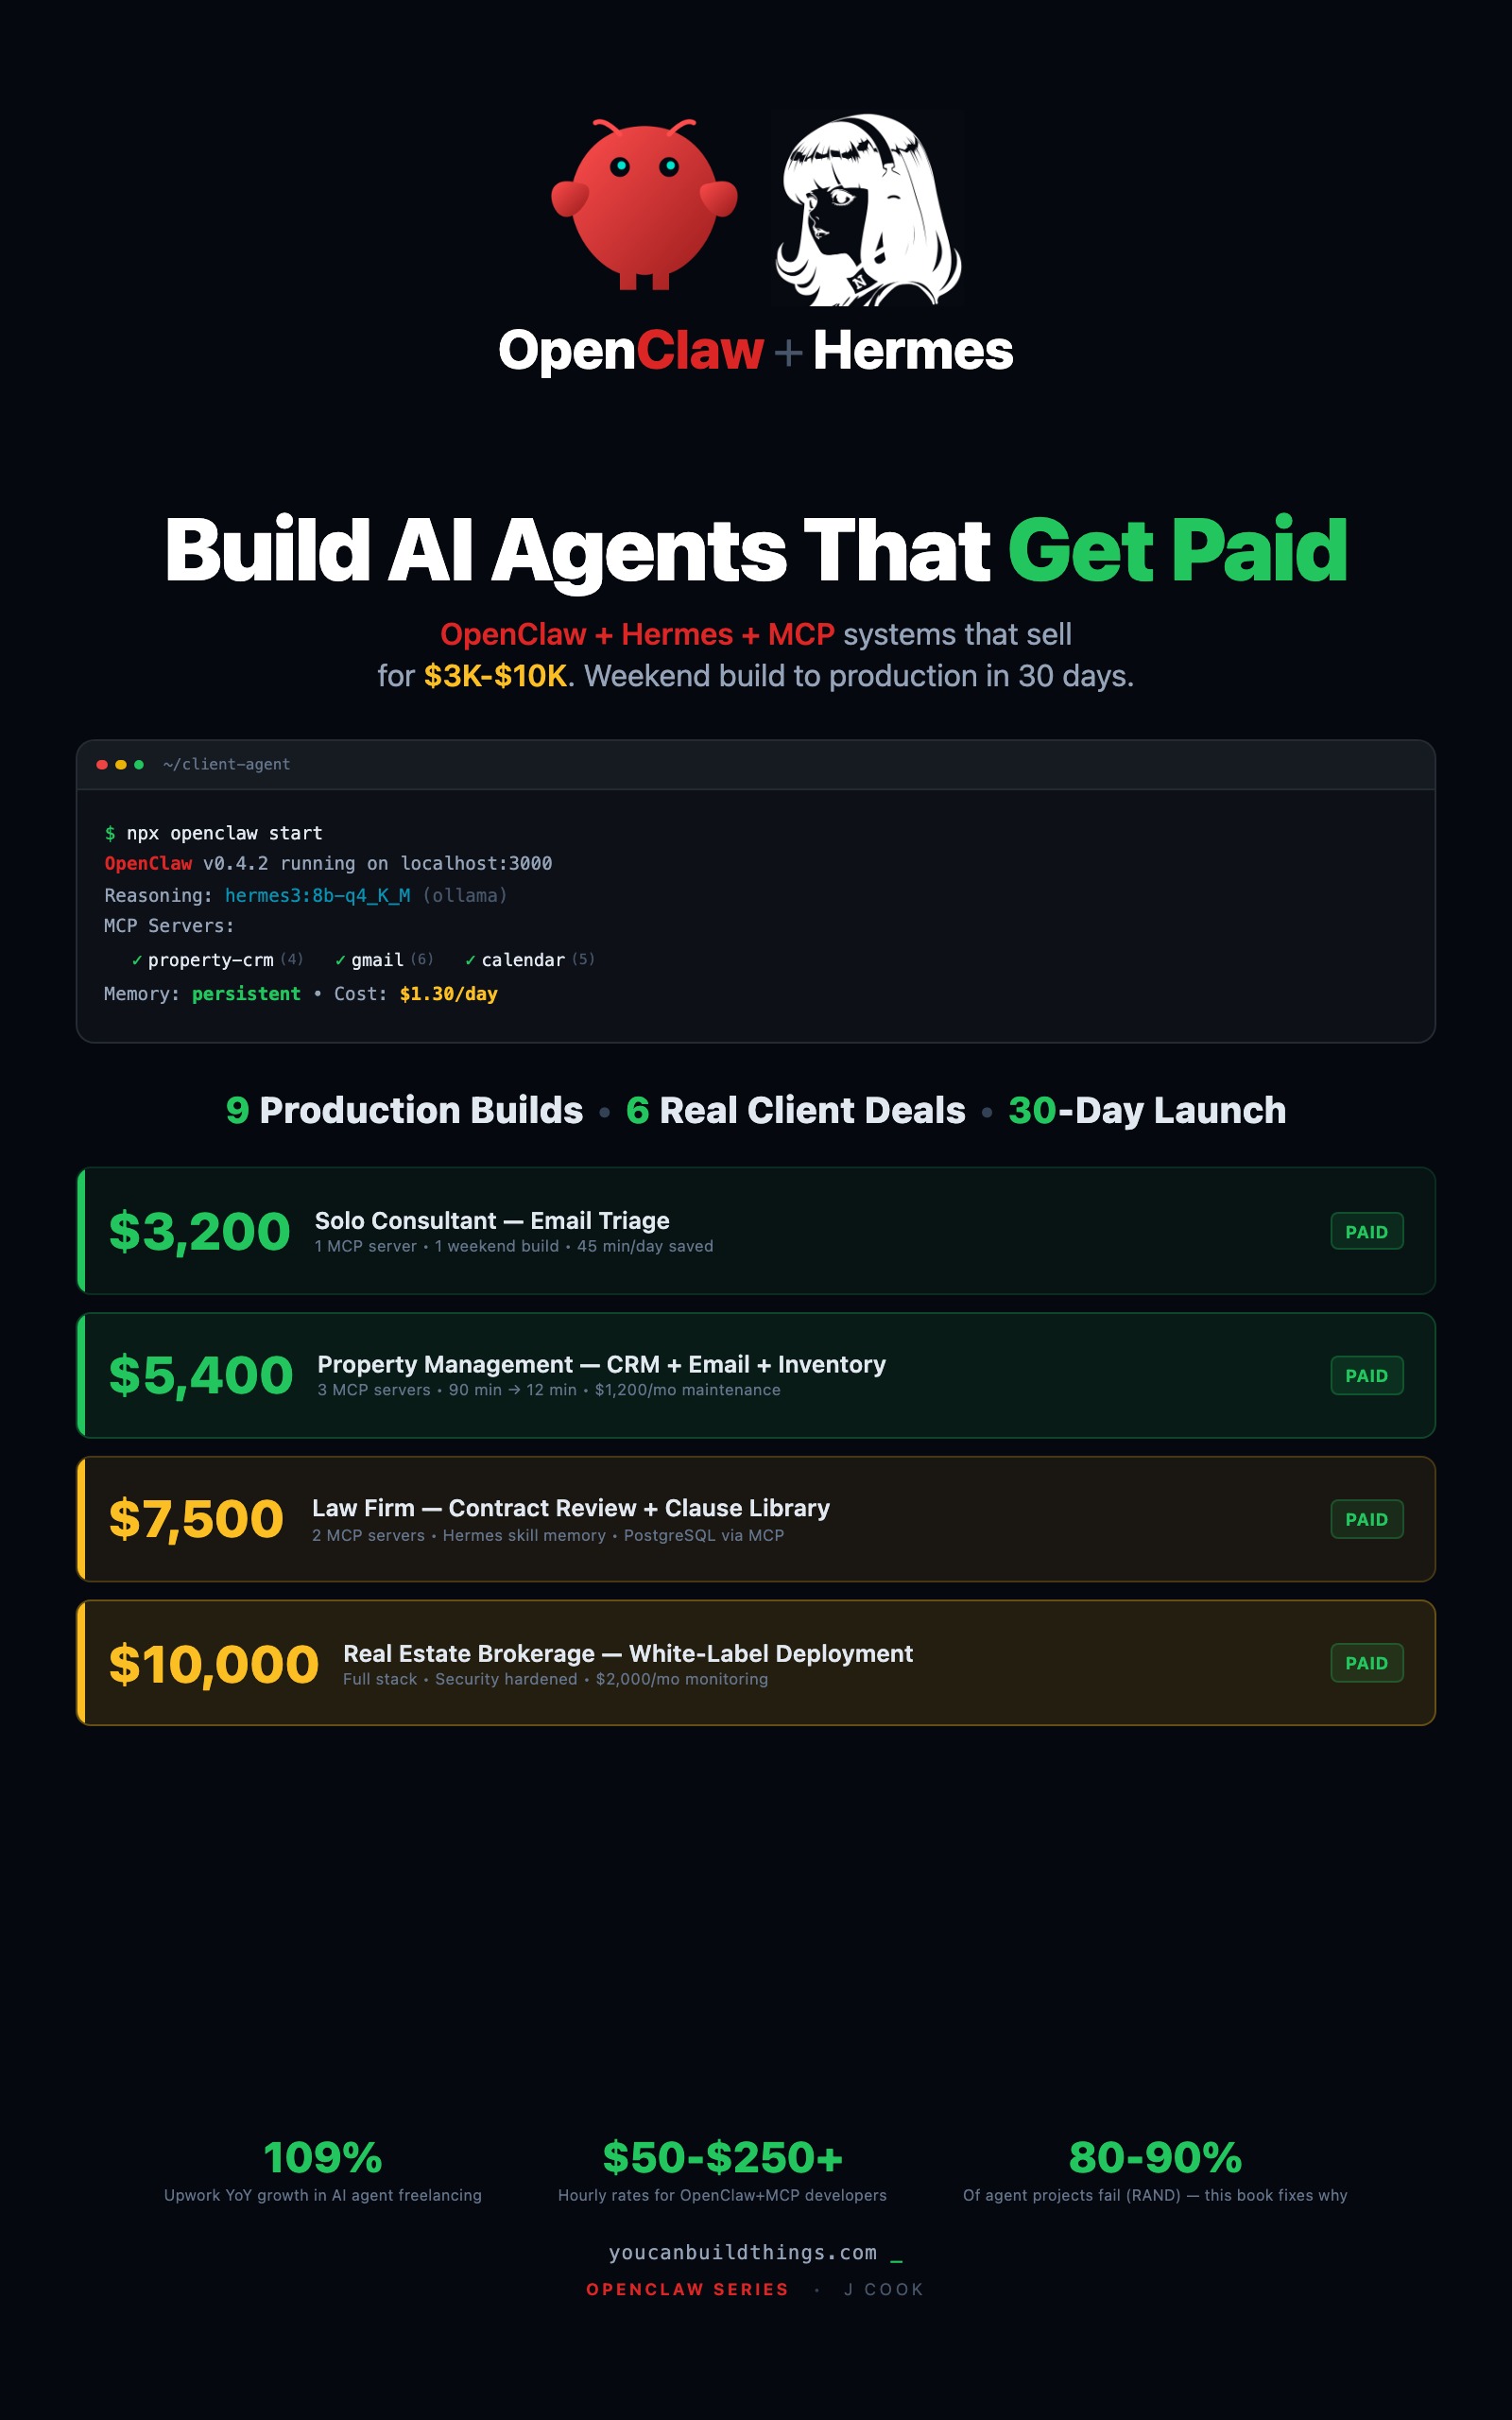
Build AI Agents That Get Paid
OpenClaw + Hermes + MCP Systems That Sell for $3K-$10K
Summary:
- Wrong Node.js version is the single biggest silent killer. Fix first, diagnose last.
- Six more pitfalls in the order you’ll hit them, each with a copy-paste fix.
- Per-OS tracks for macOS, Linux, and WSL2 so you don’t guess which command applies.
- When in doubt,
openclaw doctor --fixcatches most config problems automatically.
You ran the install command. Pressed Enter. Nothing happened. Cursor blinks, terminal is silent. No errors, no output.
That’s the most common first-time OpenClaw experience. The fix is 90 seconds, but nobody tells you which 90 seconds. Below is the pitfall list in order. Start at the top. Stop when things work.
Pitfall 1: Node.js version is wrong (60% of silent failures)
The OpenClaw install guide is explicit:
“Node 24 (recommended) or Node 22.14+”
Run anything older (Node 18, Node 20, Node 22.13) and the install fails silently. No stack trace, no error message. Just a blinking cursor.
Check your version first:
node --versionThree possible results:
v24.x.x: you’re on the recommended default. Skip to Pitfall 2.v22.14.xthroughv23.x.x: supported. You can continue, but Node 24 is recommended for production.- Anything below
v22.14.0: that’s your entire problem. Fix it below.
Pick your OS:
macOS (Apple Silicon or Intel). Use nvm. Homebrew (brew install node@24 && brew link --overwrite node@24) works if you only need one version.
curl -o- https://raw.githubusercontent.com/nvm-sh/nvm/v0.40.1/install.sh | bash
# Open a new terminal, then:
nvm install 24 && nvm use 24
node --version   # should show v24.x.x
Linux (Ubuntu / Debian). The default apt install nodejs gives you an ancient version. Use NodeSource or nvm:
curl -fsSL https://deb.nodesource.com/setup_24.x | sudo -E bash -
sudo apt-get install -y nodejs
node --version   # should show v24.x.x
For Fedora/RHEL, swap apt-get for dnf. Prefer nvm if you want a user-level install without sudo.
Windows. Install WSL2 first and follow the Linux path. Native Windows installs cause path, permission, and encoding surprises that will burn hours. If you must use native Windows, download the “Current” installer from nodejs.org and check “Add to PATH” during setup.
After upgrading, run node --version again. You should see v24.x.x (recommended) or v22.14.x or higher (supported). Still showing an old version? You have multiple Node installs. Diagnose:
which node # or "where node" on WindowsIf the path points somewhere like /usr/local/bin/node instead of ~/.nvm/versions/node/v24.x.x/bin/node, edit your .bashrc or .zshrc to put nvm’s directory first in PATH, or uninstall the system Node.
Pitfall 2: npm permission errors on WSL2 and macOS
Installing on Windows via WSL2, or on macOS with the official Node installer, you’ll see this:
npm ERR! Error: EACCES: permission denied, mkdir '/usr/lib/node_modules'The wrong instinct is sudo npm install. Don’t. Sudo with npm creates compounding permission problems: root-owned files your user can’t access, installs that can’t overwrite them, and a slow slide into a broken global npm directory.
The right fix is a user-level npm prefix:
mkdir -p ~/.npm-global
npm config set prefix '~/.npm-global'
echo 'export PATH=~/.npm-global/bin:$PATH' >> ~/.bashrc
source ~/.bashrc
Replace .bashrc with .zshrc if you’re on macOS with zsh. Re-run the install (below) and the permission error is gone permanently.
Pitfall 3: Docker containers need 2 vCPU and 4 GB RAM
This one won’t bite you on a local install, but every reader eventually tries to deploy to a cheap VPS and hits it. OpenClaw in Docker needs a minimum of 2 vCPU and 4 GB RAM. Not documented anywhere obvious. The symptom is exit code 137, which is the Linux OOM killer terminating the process.
My first production deployment was a $5/month droplet. Agent started fine. Test prompts worked. By morning the droplet was unresponsive because OpenClaw pushed past 1 GB under real workload. The OOM killer started terminating things randomly, including SSH.
If you’re going to run Docker, check your allocation up front:
docker info | grep -E "CPUs|Total Memory"Under 2 CPUs or under 4 GB and you’re going to crash under load. Upgrade your VPS tier to the $12-24/month level before you blame OpenClaw.
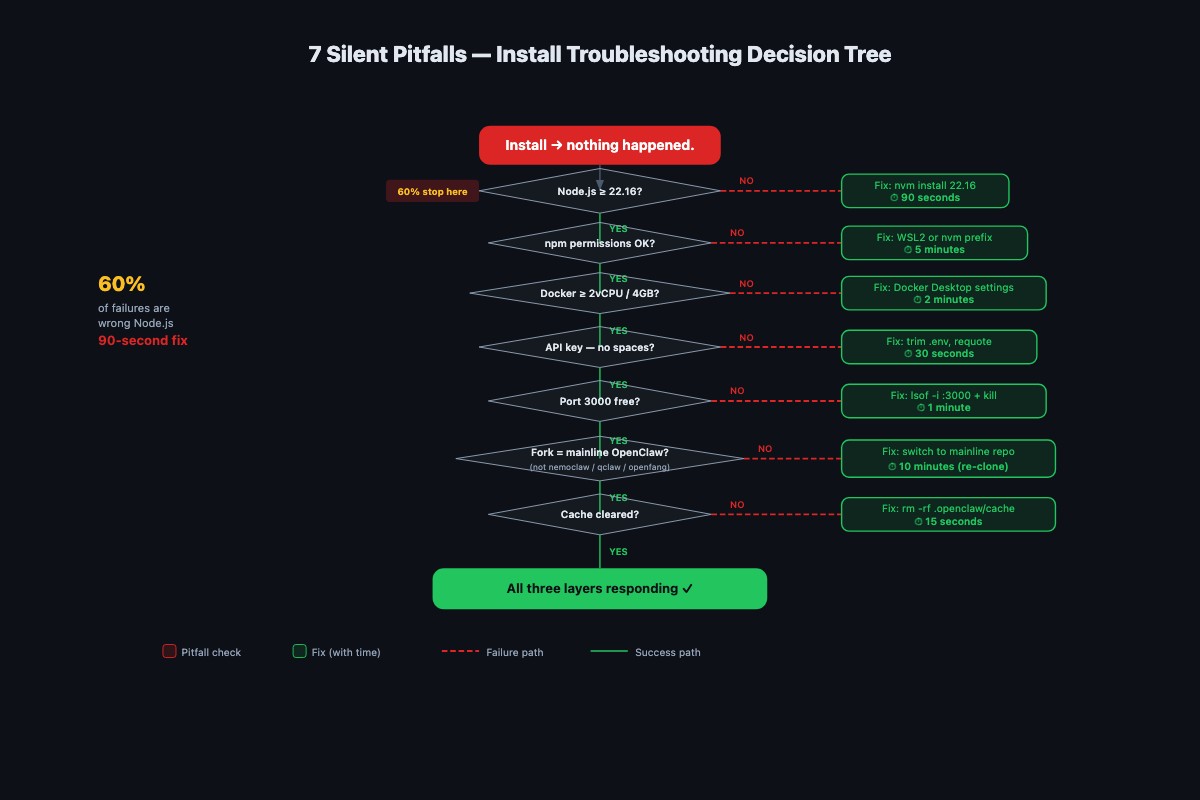
Pitfall 4: API key whitespace silently breaks authentication
The most common invisible failure: leading or trailing spaces or stray quotes around API key values. The agent starts, everything looks normal, and every external call returns “401 invalid key.” No useful error message.
Silently fails:
{ apiKey: " sk-abc123xyz... " }Also silently fails:
{ apiKey: "'sk-abc123xyz...'" }Works:
{ apiKey: "sk-abc123xyz..." }The fix: delete the value, paste it into a plain text editor (not Word, not Notes.app, a real plain text editor), strip whitespace, then paste from there into the config. If you’re seeing 401s and you swear the key is right, check for stray characters:
cat ~/.openclaw/openclaw.json | od -c | headPitfall 5: Gateway port 18789 is already in use
OpenClaw’s gateway binds to port 18789 by default. If you’re running another OpenClaw instance, or you’ve overridden gateway.port in a different config, the gateway crashes during startup with a stack trace that doesn’t clearly say “port conflict.”
Find what’s on the port:
# macOS / modern Linux
lsof -i :18789

# Older Linux
ss -tlnp | grep 18789
Either kill the conflicting process or move OpenClaw by editing ~/.openclaw/openclaw.json:
{
  gateway: {
    port: 18790
  }
}
Then restart with openclaw gateway status to verify.
If lsof shows nothing but OpenClaw still crashes on startup, you have a corrupted install from a previous failed attempt. Nuke it:
npm uninstall -g openclaw
rm -rf ~/.openclaw
npm install -g openclaw@latest
openclaw onboard --install-daemon
Pitfall 6: Config is global at ~/.openclaw/openclaw.json, not per-project
Half the older tutorials tell you to drop a config file at ./openclaw.config.json in your project directory. That file does nothing. OpenClaw reads from ~/.openclaw/openclaw.json (JSON5 format, comments and trailing commas allowed), and every edit you make to a local file in a project folder is ignored.
Verify:
ls -la ~/.openclaw/openclaw.jsonIf it doesn’t exist, OpenClaw is using safe defaults. That’s fine for first-run testing, but once you need to configure channels, MCP servers, or loop detection, you need the real file. Create it, or run openclaw onboard --install-daemon which creates it for you.
If you have a ./openclaw.config.json in a project somewhere: delete it. It’s a leftover from a fork or outdated doc and it will confuse future-you.
Pitfall 7: Corporate networks, VPNs, and stale cache
Firewall, proxy, or VPN interference is symptom-free until you connect an MCP server that needs external APIs. Then nothing works and no error makes sense. Behind a corporate proxy, export proxy vars before starting:
export HTTP_PROXY=http://your-proxy:port
export HTTPS_PROXY=http://your-proxy:port
openclaw gateway status
On a VPN, disconnect to get the stack running, then reconnect and identify which connections break (often DNS, fix with public DNS 8.8.8.8 or 1.1.1.1).
Failed install three times already? Your npm cache and previous OpenClaw state are interfering. Nuclear option:
npm cache clean --force
rm -rf ~/.openclaw
npm install -g openclaw@latest
openclaw onboard --install-daemon
Clean npm cache, clean OpenClaw state, reinstall, re-onboard. Genuinely clean start.
Your one-command diagnostic
OpenClaw ships a built-in health check that covers most of these pitfalls for you:
openclaw doctor --fixFrom the doctor command reference, --fix is an alias for --repair and applies recommended repairs automatically. It checks state integrity, legacy cron job shapes, memory-search readiness, sandbox mode (Docker availability), gateway auth tokens, channel SecretRefs, and talk configuration normalization. Run it before you debug anything manually.
Other one-liners worth knowing:
openclaw --version            # confirm CLI installed
openclaw doctor --deep        # scan for duplicate gateway installs
openclaw gateway status       # is the gateway running?
Pre-install diagnostic (for a fresh machine)
openclaw doctor --fix is great once OpenClaw is installed. On a fresh machine it isn’t. Save this script as openclaw-preflight.sh and run it before you even start the install. It catches pitfalls 1, 2, and 3 without touching your system:
#!/bin/bash
# openclaw-preflight.sh: checks 3 install-blockers on a fresh machine
set +e

MIN_NODE="v22.14.0"

version_lt() {
  [ "$1" = "$2" ] && return 1
  [ "$(printf '%s\n' "$1" "$2" | sort -V | head -n1)" = "$1" ]
}

echo "== 1. Node.js version =="
NODE_VER=$(node --version 2>/dev/null)
echo "  node: ${NODE_VER:-not installed} (need $MIN_NODE or newer; v24 recommended)"
if [ -z "$NODE_VER" ]; then
  echo "  FAIL: Node not installed. Run: nvm install 24 && nvm use 24"
elif version_lt "$NODE_VER" "$MIN_NODE"; then
  echo "  FAIL: upgrade with: nvm install 24 && nvm use 24"
else
  echo "  OK"
fi

echo "== 2. npm global prefix =="
NPM_PREFIX=$(npm config get prefix 2>/dev/null)
echo "  prefix: $NPM_PREFIX"
case "$NPM_PREFIX" in
  /usr/lib*|/usr/local/lib*|/opt/*)
    echo "  FAIL: system prefix (needs sudo for global installs). Fix:"
    echo "    npm config set prefix '~/.npm-global'"
    ;;
  *) echo "  OK (user-writable)" ;;
esac

echo "== 3. Docker resources (if using Docker) =="
if command -v docker >/dev/null 2>&1; then
  docker info 2>/dev/null | grep -E "CPUs|Total Memory" || echo "  Docker not running"
  echo "  (need 2+ vCPU and 4+ GB RAM for OpenClaw)"
else
  echo "  Docker not installed (fine for local install)"
fi
chmod +x openclaw-preflight.sh
./openclaw-preflight.shThree seconds to run. Tells you which pitfall is biting you so you can skip straight to the fix.
The right install order (do this once, never debug again)
Start with the dependencies, verify each, then install:
# 1. Confirm Node.js 22.14+ (24 recommended)
nvm install 24 && nvm use 24 && node --version

# 2. Confirm npm prefix is user-level
npm config set prefix '~/.npm-global'

# 3. Install OpenClaw globally
npm install -g openclaw@latest

# 4. Run onboarding (creates ~/.openclaw/openclaw.json, installs daemon)
openclaw onboard --install-daemon

# 5. Health check
openclaw doctor --fix

# 6. Confirm the gateway is healthy
openclaw gateway status
Six commands. Each one verifies the previous step. If any one fails, you know exactly which pitfall you hit because you’re not running in the dark.
What should you actually do?
- If your install is silently failing: run
node --versionfirst. If it’s below 22.14, stop reading and fix that. You’ve probably saved yourself two hours. - If you see
EACCES permission denied: configure the user-level npm prefix (Pitfall 2). Neversudo npm install. - If you’re deploying to a VPS: do not pick the cheapest tier. 2 vCPU and 4 GB RAM is the minimum. Under that, you get silent crashes that look like OpenClaw bugs but are actually OOM kills.
- If you can’t find your config: it’s at
~/.openclaw/openclaw.json, not in your project directory. Runopenclaw onboardif the file doesn’t exist yet. - If you’ve already failed three times: save the preflight script above, run it, then run
openclaw doctor --fix. Two commands catch ~95% of install problems.
bottom_line
- The silent failures are almost always Node.js version. Check that first, every time, no exceptions.
openclaw doctor --fixis your first-line tool once OpenClaw is installed. The preflight script is your first-line tool before it’s installed. You only need both if things are really broken.- If you hit a new pitfall that’s not on this list, add it to your own copy. Future you will be grateful.
Frequently Asked Questions
Why does OpenClaw fail silently when I install it?+
About 60% of silent OpenClaw install failures come from the wrong Node.js version. The docs require Node 22.14 or newer, with Node 24 as the default recommended runtime. Older versions fail with no useful error. Run `node --version` first, always.
What Node version does OpenClaw need?+
Node 22.14 or newer. Node 24 is the default and recommended runtime for installs, CI, and release workflows. The easiest fix is nvm: `nvm install 24 && nvm use 24`, then verify with `node --version`.
Where does OpenClaw keep its config file?+
At `~/.openclaw/openclaw.json` in JSON5 format. It's a global file, not a per-project `./openclaw.config.json`. If a tutorial tells you to drop a config in your project directory, the tutorial is out of date.