Add Stripe Payments to Your Claude Code App
Take your Claude Code app from free to first payment. Wire Stripe Checkout and a webhook, run the 5-gate launch checklist, and ship something people pay for.
>This is the payment flow in brief. Claude Code for Beginners builds the full pricing page, webhook, and launch checklist on a real app.
Summary:
- Claude writes the Stripe code; you handle the account setup and the test card.
- Wire a webhook so a payment counts even if the browser redirect fails.
- Run the 5-gate launch checklist before you tell a single person.
- Walk away with a live product a stranger can find, try, and pay you for.
Here is how to add Stripe payments to a Claude Code app in an afternoon, and take it from free to its first dollar. Your app works, looks good, and is secure. It’s also free, so nobody can pay you for it even if they want to. The gap between “it works” and “it earns” is three things Claude builds in one sitting: a price, a payment button, and a way to know the money landed. Here’s the whole flow.
How do you add Stripe payments to a Claude Code app?
You describe it, Claude builds it. Stripe is the standard, takes no monthly fee, and charges only when you get paid. Hand Claude the whole feature:
Add Stripe payment integration. Create a pricing page with two tiers: Free (up to 10 tasks) and Pro ($5/month, unlimited). Use Stripe Checkout. After a successful payment, store the subscription status in the database. Free users hit an upgrade prompt at the 10-task limit.Claude installs the SDK, builds the pricing page, the Checkout endpoint, and the webhook handler, and enforces the limit. Then you do the four things Claude can’t: create a Stripe account, copy your test keys (pk_test_ and sk_test_), create a $5/month product, and copy its price ID (price_). Drop those into .env.local.
Test the flow with Stripe’s test cards (these are real, from Stripe’s testing docs):
Successful payment:           4242 4242 4242 4242
Generic decline:              4000 0000 0000 0002
Insufficient funds decline:   4000 0000 0000 9995
Use any future expiry, any CVC, any ZIP. Pay with 4242 4242 4242 4242 and the page should redirect to success, your account should flip to Pro, and the task limit should vanish. Stripe’s published rate, from their pricing page: 2.9% + 30¢ per successful domestic card charge. You pay nothing until a real customer does.
What’s the webhook, and why does it matter?
A webhook is how your app learns a payment happened even if the browser redirect fails. If the customer pays and their connection drops on the way back, the redirect never fires and your app never flips them to Pro. The webhook is a URL Stripe calls directly, so the upgrade lands no matter what.
Testing it locally needs the Stripe CLI, a separate tool from the SDK Claude installed:
brew install stripe/stripe-cli/stripe
stripe listen --forward-to localhost:3000/api/webhooks/stripe
The first run prints a signing secret (whsec_). Paste it into STRIPE_WEBHOOK_SECRET and restart the dev server. Run another test purchase and watch the events fire:
--> checkout.session.completed [evt_...]
<-- [200] POST http://localhost:3000/api/webhooks/stripe
--> customer.subscription.created [evt_...]
<-- [200] POST http://localhost:3000/api/webhooks/stripe
Every [200] means your handler accepted that event. Now the account flips to Pro from the webhook, not the redirect. That’s the difference between a payment system and a demo.
How do you know it’s ready to launch?
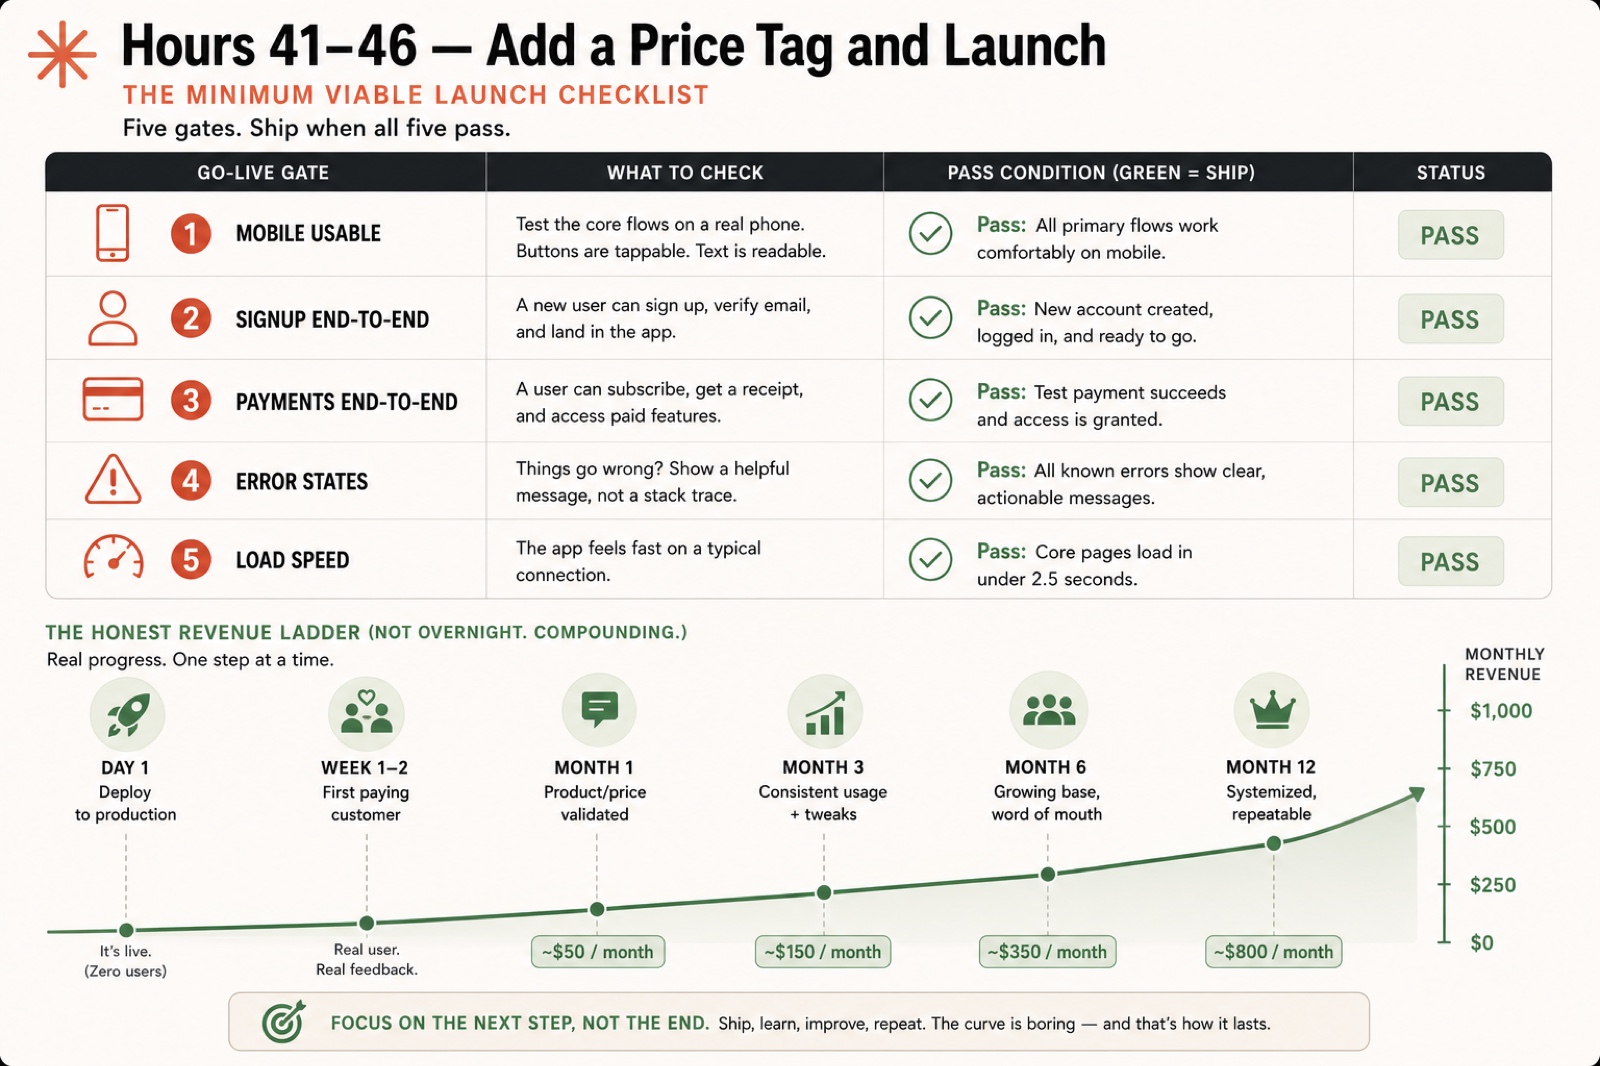
Run all five gates. Ship when all five pass:
| Gate | What to check | Pass condition |
|---|---|---|
| Mobile usable | Open the landing page and app on a phone | Every primary flow works, buttons are tappable |
| Signup end-to-end | New user signs up and lands in the app | Account created, logged in, ready |
| Payments end-to-end | Subscribe, then cancel in Stripe | Charge shows, database flips to Pro, cancel reverts to Free |
| Error states | Force a failed payment and a non-firing webhook | Each shows a clear message, not a white screen |
| Load speed | Open DevTools, Network tab, reload | Core pages load in under 2.5 seconds |
Five passes and you’re ready to share. Skip them and your first real user finds the bug for you, in public.
What can you actually expect to make?
A task tracker won’t make you a millionaire. It makes money and proves you can ship a paid product. The honest revenue ladder, at Pro $5/month rising to $8 as you add features:
| Milestone | Monthly revenue |
|---|---|
| Month 1 (ambitious but doable) | ~$50 |
| Month 3 (consistent usage) | ~$150 |
| Month 6 (word of mouth) | ~$350 |
| Month 12 (systemized) | ~$800 |
Not overnight. Compounding. The real win isn’t this app’s revenue, it’s proof you can ship a paid product. The next one is faster and aimed bigger.
What broke
Four Stripe gotchas hit almost everyone. Each has a one-line fix.
Every webhook event returns [400]. Your STRIPE_WEBHOOK_SECRET doesn’t match the one the CLI printed. Paste the right one and restart.
The success page works locally, dead link in production. Claude hardcoded localhost:3000. Tell it: “Make the Checkout success and cancel URLs use an environment variable for the base URL, not a hardcoded value.”
A free user creates task #11 through the API. The limit check lives only in the UI. Tell Claude: “Add the 10-task limit check in the createTask server action, not just the UI. Reject creation for free users at 10 tasks.”
Payment shows in Stripe, database still says free. The webhook isn’t firing or isn’t finding the user. Tell Claude: “The Stripe webhook fires but the subscription field isn’t updating. Confirm the route is reachable and the right user is found and updated.”
What should you actually do?
- If you’re adding payments → let Claude build the code, but set up the Stripe account and webhook yourself. Those are the parts it can’t reach.
- If you only test the redirect → test the webhook too. A dropped connection after payment is exactly the case that loses you a paying customer.
- If a free user can bypass the limit → move the check into the server action. UI-only limits are decoration.
- If load speed is over 2.5 seconds → compress images and lazy-load below-the-fold content before you launch.
- If you’re waiting to feel “ready” → run the five gates. If they pass, you’re ready. Ship it.
The bottom line
- The payment button is the cheapest part. The webhook is what makes it real, so don’t skip it because the redirect “works.”
- The revenue ladder is boring on purpose. ~$50 in month one is a win, because it proves a stranger will pay you for something you built in a weekend.
- Ship at the fifth green gate, not when you feel brave. Forty-six hours ago you had an empty folder. Now you have a product someone can buy.
Frequently Asked Questions
How do I add payments to an app built with Claude Code?+
Tell Claude to add Stripe Checkout with a free and a pro tier. Claude writes the code; you create the Stripe account, copy the test keys, and test the flow with card 4242 4242 4242 4242.
What is the Stripe test card number?+
4242 4242 4242 4242, with any future expiry, any CVC, and any ZIP. It simulates a successful payment in test mode so you can verify the whole flow before going live.
How much does Stripe charge per transaction?+
2.9% plus 30 cents per successful domestic card charge in the US, with no monthly fee. You pay nothing until you actually earn something.