Build a Micro-SaaS with Claude Code This Weekend
Ship a URL monitoring SaaS with auth, Stripe payments, and Docker deployment using Claude Code's 7-phase build workflow. Copy-paste prompts for each phase.
>This covers the SaaS build workflow. Ship It with Claude Code goes deeper on skills, MCP, automation, and advanced prompt patterns.
Ship It with Claude Code
How Developers Are Shipping SaaS Apps and Automating Their Jobs in a Weekend
Summary:
- Build a revenue-generating URL monitoring SaaS (PingBot) using Claude Code’s 7-phase workflow.
- FastAPI + PostgreSQL + HTMX + Stripe. No React, no webpack, no overcomplicated frontend.
- Total operating cost under $20/month. Break even at 3 paying customers.
- Copy-paste prompts for each phase, plus the CLAUDE.md constraints that prevent $340 API bills.
I tried building a SaaS with Claude Code three times before I got it right. The first attempt used microservices because that is what Claude Code suggested when I said “build a SaaS.” The second attempt overcorrected with a stack too minimal to handle Stripe webhooks. The third time, I started by listing everything a paying customer would need and worked backwards. That version shipped.
What does a paying customer actually need?
Seven things. Sign up and log in. Add URLs to monitor with configurable check intervals. A dashboard showing all monitored URLs with current status. Email alerts when a URL goes down. Email alerts when it comes back up. Uptime history across 24 hours, 7 days, and 30 days. Subscription management for upgrade, downgrade, and cancel.
That’s the entire MVP. No team features, no API, no Slack integration. Those come later if people pay.
# PingBot pricing model
PLANS = {
    "free": {
        "max_monitors": 3,
        "min_interval_seconds": 900,  # 15 minutes
        "price_monthly": 0,
    },
    "pro": {
        "max_monitors": 50,
        "min_interval_seconds": 60,   # 1 minute
        "price_monthly": 9,
    },
}
The pricing is simple on purpose. Free tier with 3 URLs at 15-minute checks. Pro tier at $9/month for 50 URLs with 1-minute checks and SMS alerts. Two tiers, one upgrade path.
Why does the stack matter this much?
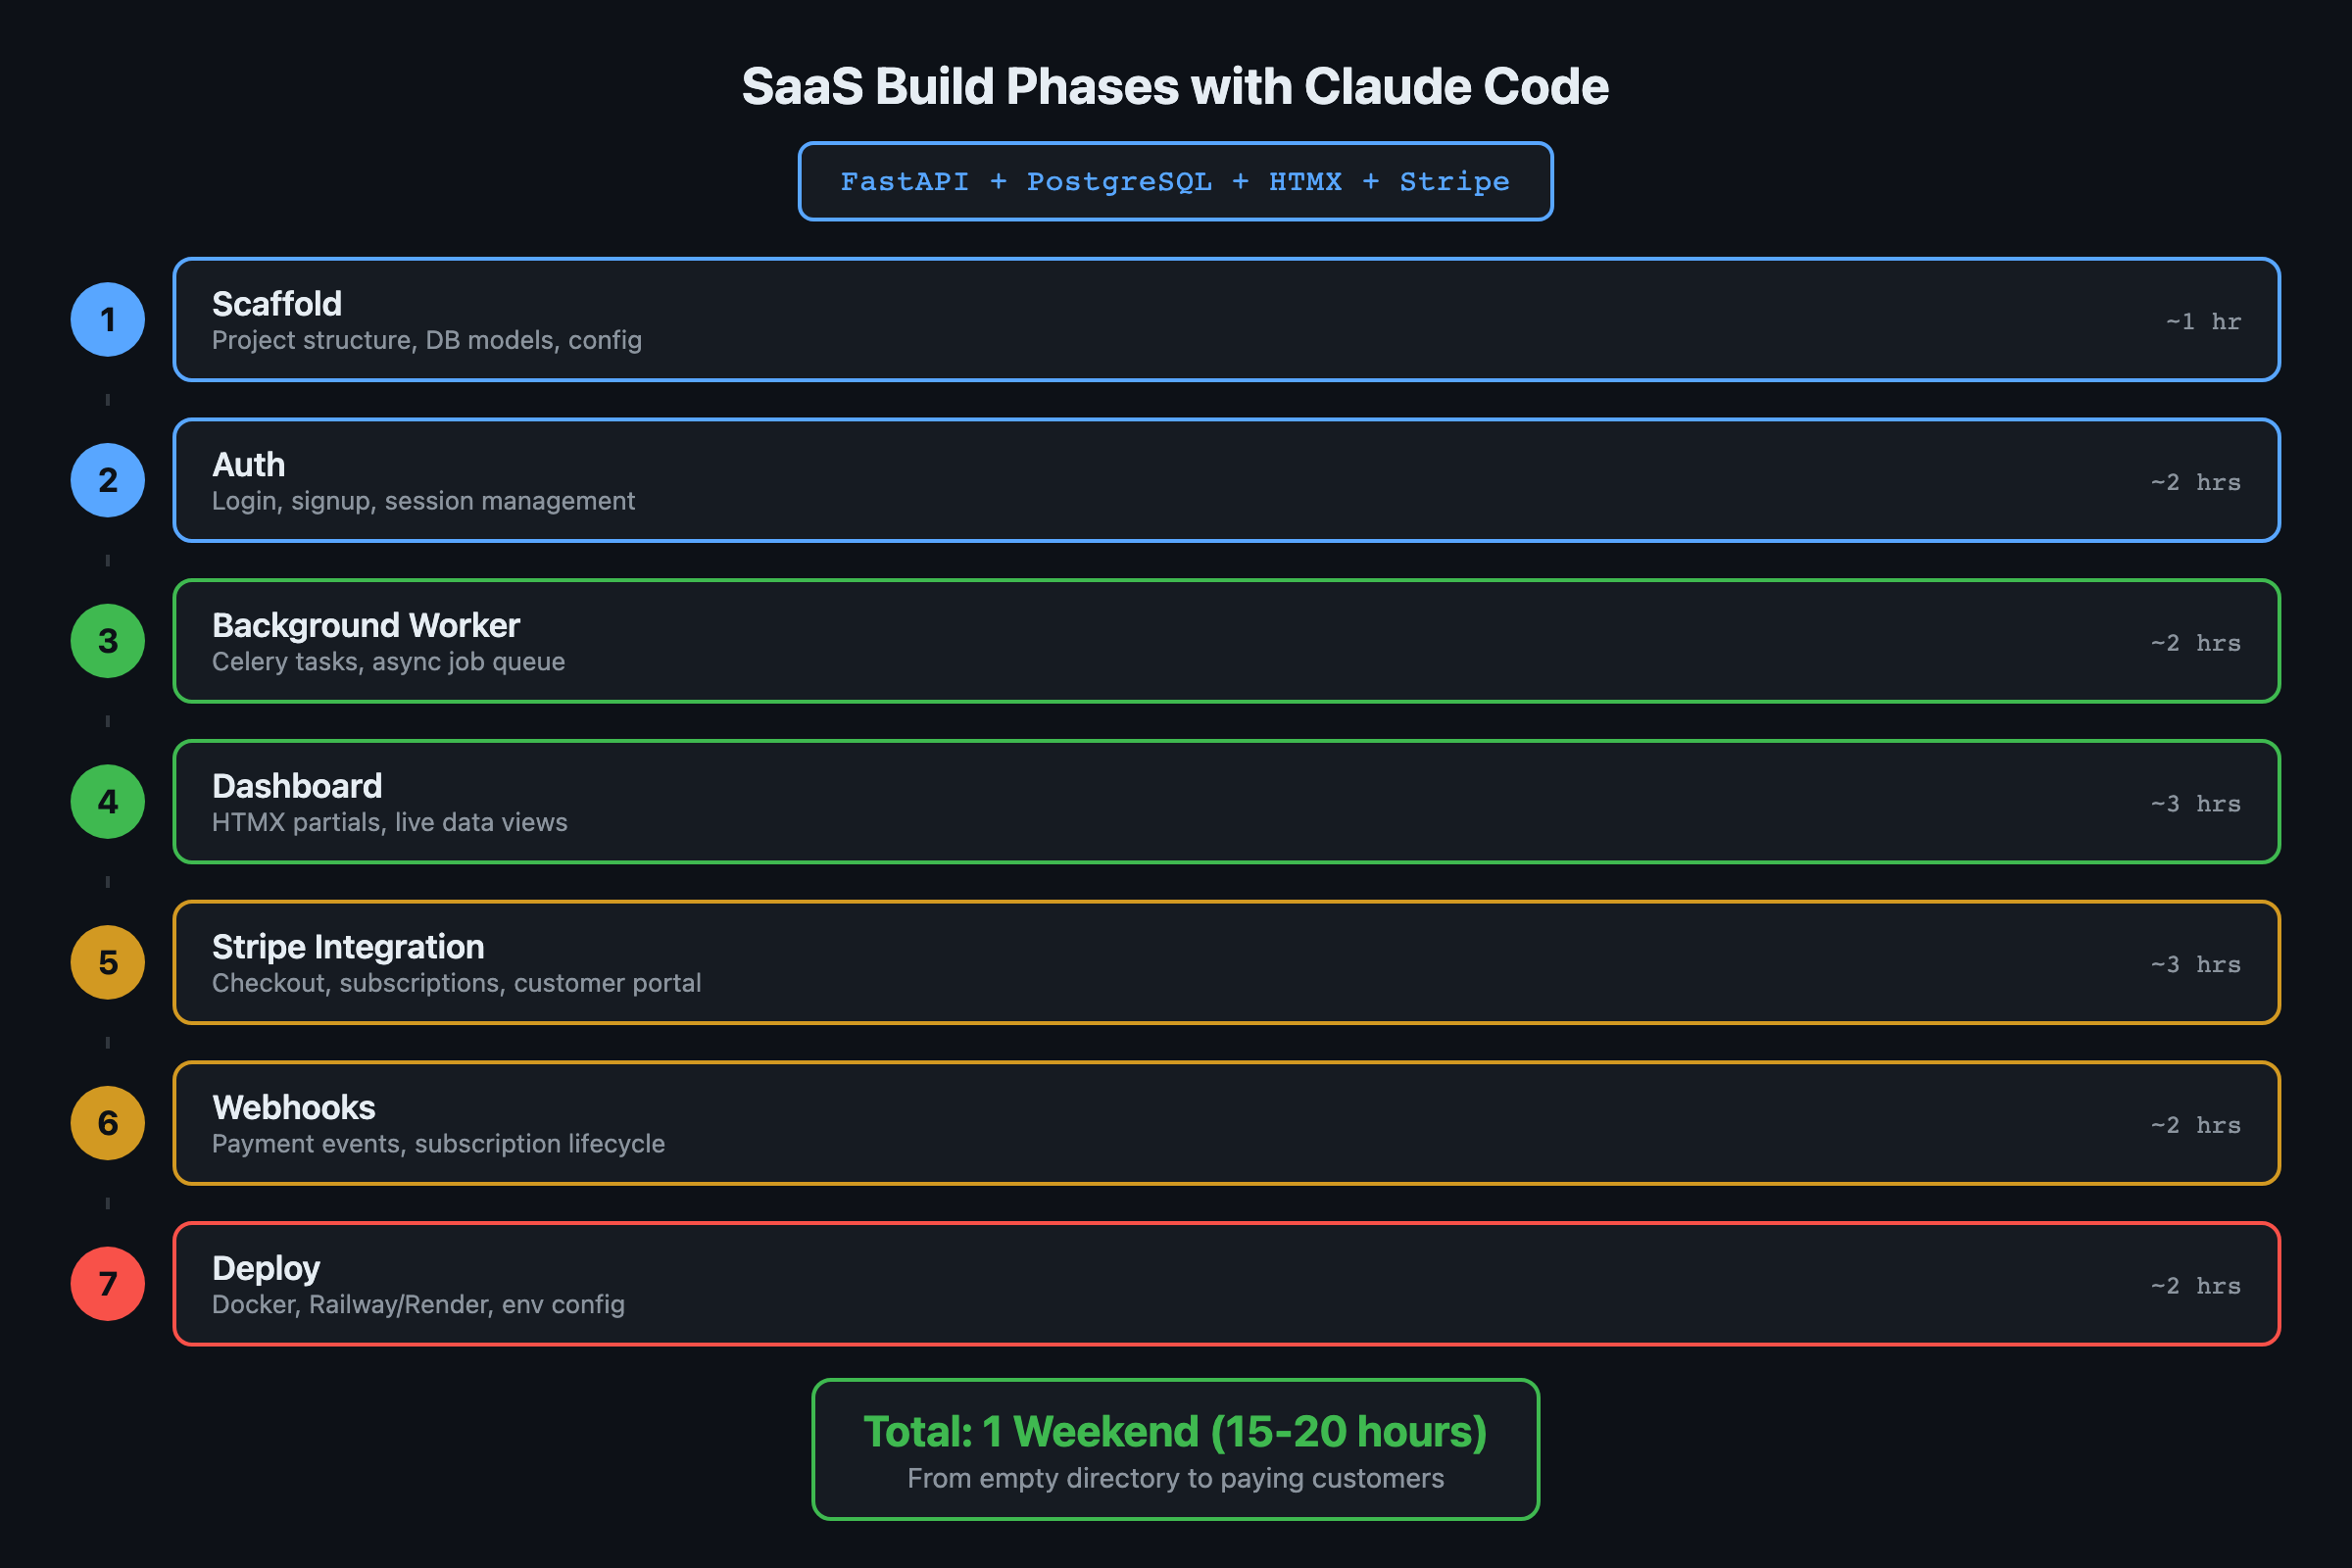
The stack determines whether you finish in a weekend or give up Sunday night. Here is what survived three attempts.
| Component | Choice | Why |
|---|---|---|
| Backend | FastAPI (Python 3.12) | Async-ready, handles concurrent URL checks |
| Database | PostgreSQL | Concurrent users, proper migrations, not a single-file SQLite |
| Frontend | HTMX + Jinja2 | No npm, no webpack, no React state management |
| Payments | Stripe | Clean API, customers already have accounts |
| SendGrid | Free tier covers 100 emails/day | |
| Deploy | Docker + VPS | $5-10/month, done |
HTMX over React is the opinion that saved the most time. For a dashboard where people view data and click buttons, server-rendered HTML is simpler and faster to build. Claude Code builds Jinja2 templates roughly twice as fast as React components. I watched developers lose entire days to React state management for apps that could have been three HTML pages with some HTMX sprinkles.
Monolith first. Claude will suggest microservices, separate auth servers, or message queues. Say no. A single app with SQLite or PostgreSQL handles 10,000 users. Split later when you have the revenue to justify the complexity.
How do you structure the Claude Code prompts?
You break the build into seven phases. Each phase gets its own prompt with its own review checkpoint. This is the single most important lesson from the SaaS build: do not dump everything into one prompt.
Phase 1: Scaffold and database
claude "Set up a FastAPI project for a URL monitoring SaaS called PingBot.
PostgreSQL database via SQLAlchemy with async support and Alembic migrations.

Models needed:
- User (email, hashed_password, stripe_customer_id, plan_tier, created_at)
- Monitor (user_id FK, url, check_interval_seconds, is_active, created_at)
- Check (monitor_id FK, status_code, response_time_ms, is_up, checked_at)
- Alert (monitor_id FK, alert_type [down/up], sent_at, channel [email/sms])

Include a docker-compose.yml with PostgreSQL.
Create the initial migration.
Include a .env.example with all required environment variables."
After this runs, review the models. Check that the User model includes Stripe fields, the Monitor stores check intervals properly, the Check model has indexes on (monitor_id, checked_at), and all foreign keys use cascade delete.
Phase 2: Authentication
claude "Add authentication to PingBot using python-jose for JWT tokens
and passlib for password hashing. Implement:
1. POST /auth/register (email + password, creates Stripe customer)
2. POST /auth/login (returns JWT)
3. POST /auth/forgot-password (sends reset email)
4. POST /auth/reset-password (with token)
5. Middleware that protects all /api/ routes
6. Rate limiting on auth endpoints (5 attempts per minute)

Use httponly cookies for the JWT, not localStorage.
Include proper CORS configuration."
Test the login flow manually before moving to Phase 3. One sentence of correction now saves a full refactor later.
What about the monitoring engine?
Phase 3 builds the async background worker. This is where constraints in your prompt save you real money.
claude "Build the URL monitoring background worker for PingBot.

Requirements:
- Async worker that checks URLs at their configured intervals
- For each check: HTTP GET with 10-second timeout, record status code
  and response time
- A URL is 'down' if: status code >= 500, timeout, or connection error
- When a URL transitions from up to down: create a DOWN alert
- When a URL transitions from down to up: create an UP alert
- Process alerts by sending emails via SendGrid

Run the worker as a separate process alongside the FastAPI server.
Do NOT check URLs more frequently than their configured interval."
That last constraint is critical. Skip it and Claude Code defaults to the simplest implementation: one HTTP request per coin per refresh cycle. On my first dashboard build (a crypto tracker before PingBot), the first version made 47 API calls per second. The monthly bill was heading toward $340 before I caught it. Write your constraints before you prompt. Always.
What broke during the build?
The HTMX live-polling caused the biggest headache. Phase 4 builds the dashboard with HTMX for live status updates that poll every 30 seconds. Claude Code wired the polling correctly, but the initial implementation hammered the database with a fresh query on every poll for every connected user. 10 users with dashboards open meant 20 database queries per minute just for status updates.
The fix was a one-liner in the prompt: “Cache the dashboard status response for 15 seconds so multiple users hitting the same endpoint get the cached result.” Claude Code added Redis in-memory caching in about 90 seconds.
Phase 5: Stripe integration
# Webhook handler structure Claude Code generates
@app.post("/stripe/webhook")
async def stripe_webhook(request: Request):
    payload = await request.body()
    sig_header = request.headers.get("stripe-signature")
    event = stripe.Webhook.construct_event(
        payload, sig_header, STRIPE_WEBHOOK_SECRET
    )

    match event["type"]:
        case "checkout.session.completed":
            await activate_pro(event["data"]["object"])
        case "customer.subscription.deleted":
            await downgrade_to_free(event["data"]["object"])
        case "invoice.payment_failed":
            await handle_payment_failure(event["data"]["object"])

    return {"status": "ok"}
Run through a complete payment flow with Stripe test cards after this phase. From Stripe’s testing documentation:
| Test Card | Behavior |
|---|---|
4242 4242 4242 4242 | Succeeds and charges the card |
4000 0000 0000 3220 | Triggers 3D Secure authentication |
4000 0000 0000 0002 | Always declines (generic_decline) |
Use 4242 to test the happy path: checkout session, webhook fire, account upgrade to Pro. Use 0002 to confirm your invoice.payment_failed handler sends the warning email correctly.
Stripe fees: 2.9% + $0.30 per transaction in the US. International cards add 1%. These fees are baked into the cost math below.
How much does the whole thing cost to run?
Here is the actual operating cost breakdown.
def monthly_cost(paying_customers: int) -> dict:
    """PingBot operating cost calculator"""
    vps = 7.50           # DigitalOcean basic droplet
    postgres = 0         # included on VPS
    sendgrid = 0         # free tier: 100 emails/day
    stripe_per_tx = 0.56 # 2.9% + $0.30 on $9

    total_cost = vps + (stripe_per_tx * paying_customers)
    total_revenue = 9 * paying_customers
    profit = total_revenue - total_cost

    return {
        "monthly_cost": round(total_cost, 2),
        "monthly_revenue": total_revenue,
        "profit": round(profit, 2),
        "break_even_customers": 1,  # $9 > $8.06
    }

# Example: 10 paying customers
print(monthly_cost(10))
# {'monthly_cost': 13.1, 'monthly_revenue': 90, 'profit': 76.9}
The Claude Code API cost for the entire build, including iterations and debugging across all seven phases, runs $15-25. That is a one-time development cost. Monthly operating cost stays under $20 until you hit serious scale.
What should you actually do?
- If you have never used Claude Code before: start with the crypto dashboard from Chapter 5 of the book. It is simpler and teaches the same phased workflow without payment complexity.
- If you want revenue this weekend: follow the PingBot build above. Seven phases, review after each one, test Stripe with real test cards before deploying.
- If you already have a SaaS idea: swap PingBot’s models for your domain models in Phase 1. The phase structure (scaffold, auth, core engine, frontend, payments, tests, deploy) works for any SaaS.
Before deploying: Run staging first. Set up a rollback plan (keep the previous build artifact). Connect error monitoring (Sentry free tier is enough). Never deploy on Friday.
What does the full system look like?
This article covers the phased build process. Ship It with Claude Code includes 12 complete project builds, each with phase prompts, review checklists, and anti-pattern libraries.
Here’s one piece, the Phase 1 review checklist:
## Phase 1 Review (before moving to Phase 2)
- [ ] Single entry point works (no routing yet)
- [ ] Core data model handles the primary use case
- [ ] One happy-path test passes end to end
- [ ] No hardcoded secrets in source files
- [ ] README has setup instructions that work on a fresh clone
That’s 1 of 7 phase checklists. The full set covers everything from initial scaffold through production deployment.
bottom_line
- Start with what a paying customer needs, not what the architecture should look like. “What does the user need?” is better than “what framework should I use?”
- HTMX over React for dashboard apps. Claude Code builds server-rendered templates faster, and you skip the entire frontend build pipeline.
- The 7-phase approach with review checkpoints between each phase is what makes weekend SaaS builds actually work. One massive prompt produces one massive mess.
Frequently Asked Questions
How long does it take to build a SaaS with Claude Code?+
A functional SaaS with auth, payments, and deployment takes a weekend (roughly 15-20 hours of prompting and review) if you plan phases before you start building.
How much does it cost to run a micro-SaaS built this way?+
Under $20/month total. A basic VPS runs $5-10, SendGrid free tier covers 100 emails/day, and Stripe takes 2.9% + $0.30 per transaction. You break even at 3 paying customers on a $9/month plan.
Should I use React or server-rendered templates for a Claude Code SaaS?+
Server-rendered templates with HTMX. Claude Code builds Jinja2 templates roughly twice as fast as React components, and for a dashboard app you avoid the entire npm/webpack/state-management overhead.