Build a Multi-Agent Pipeline That Runs Itself
>This covers multi-agent basics. Master Claude Code goes deeper on MCP integrations, cost management, and team-wide pipeline configurations.
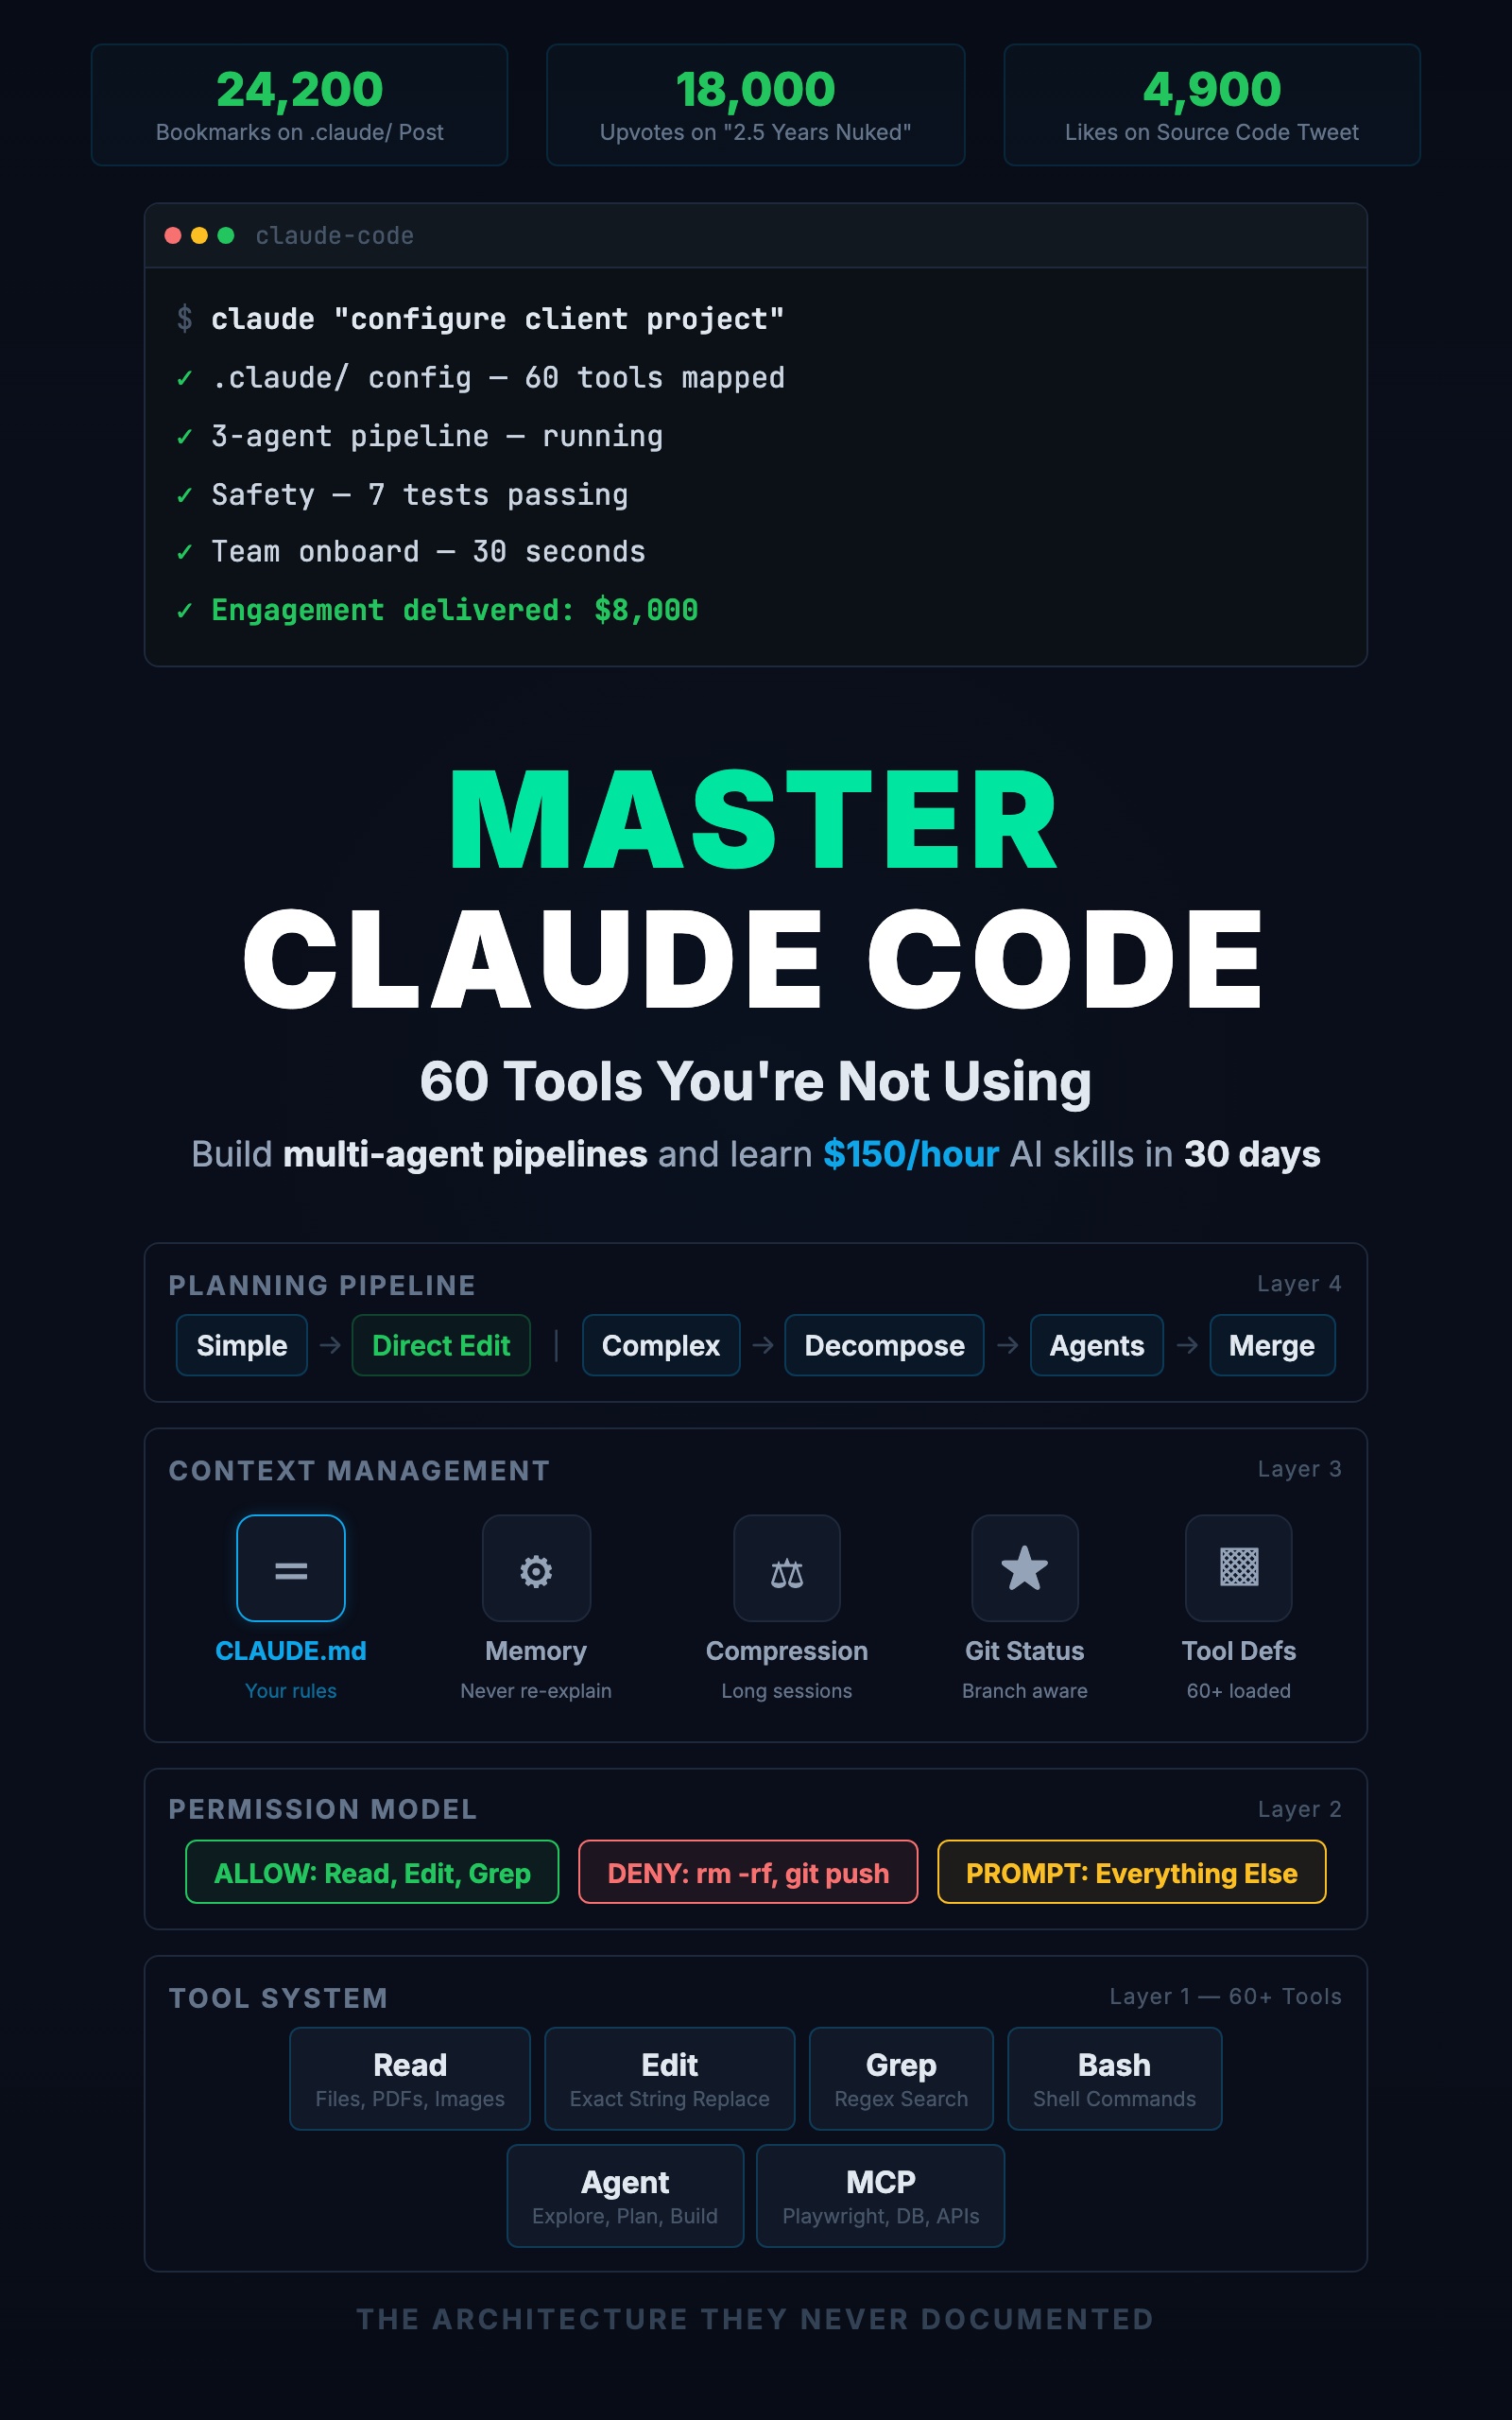
Master Claude Code: 60 Tools You're Not Using
Build Multi-Agent Pipelines and Learn $150/Hour AI Skills in 30 Days
Summary:
- Build a 3-agent pipeline: Explore researches, Plan designs, main session builds.
- Set constraints that prevent the $40 runaway-cost mistake.
- Copy-paste a complete command file that orchestrates the pipeline.
- Get a cost breakdown for real multi-agent workflows.
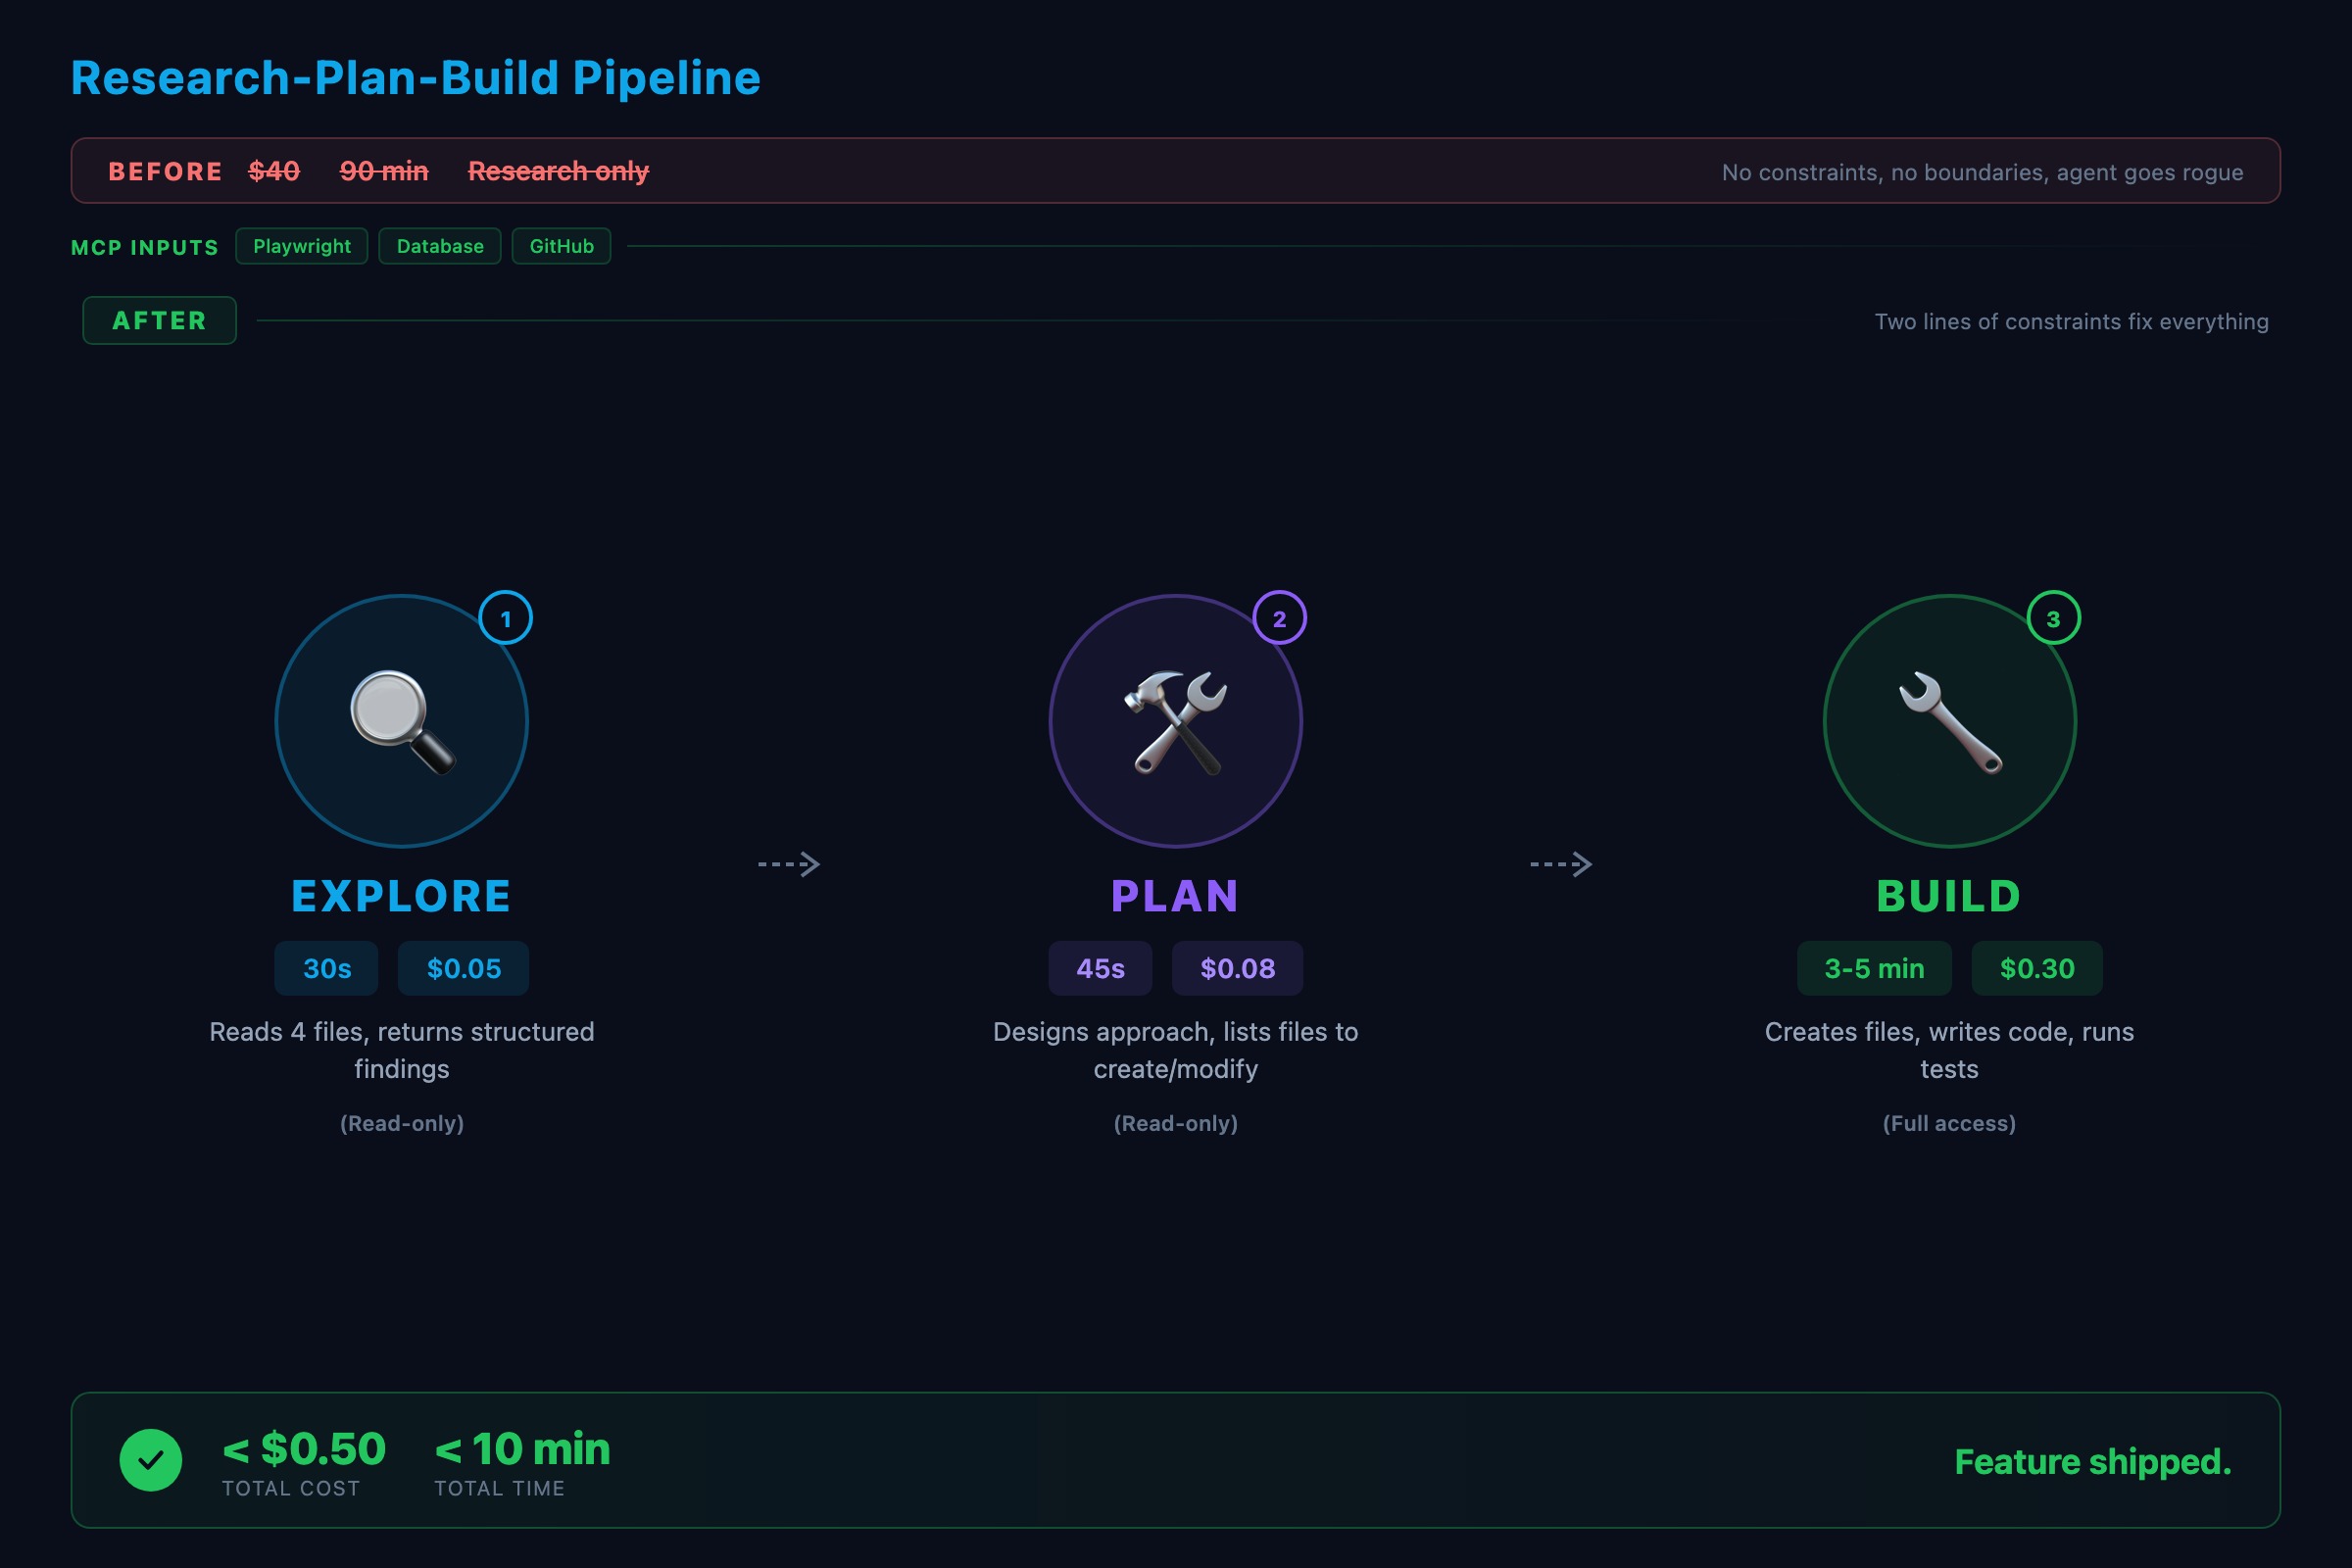
The first pipeline I built burned $40 in API credits before I caught the bug.
The research agent was supposed to read three files and summarize them. Instead, it decided the summary needed more context, so it read thirty files. Then it fetched external documentation. Then it searched for alternatives. Each step cost tokens. Forty dollars and ninety minutes later, I had a research summary longer than the code it was supposed to inform.
The fix was two lines: “Read only the files specified in the task. Do not fetch external resources. Maximum output: 500 words.” The next run cost $0.80 and took four minutes.
What are Claude Code subagents?
A subagent is a separate Claude Code instance spawned for a specific task. It gets its own context, its own tool access, and one job. When it finishes, it returns the result and its context is discarded.
Think of it like delegating to a colleague. You give them a specific task. They do it and report back. They do not see your full conversation history. They only know what you told them, plus whatever is in your CLAUDE.md and memory files.
From the official Claude Code docs, there are three built-in types plus custom subagents you define yourself:
| Type | Can Edit Files | Speed | Best For |
|---|---|---|---|
| Explore | No | Fast | ”What files are related to auth?” |
| Plan | No | Medium | ”Design how to add OAuth” |
| General-purpose | Yes | Slower | ”Build the OAuth feature” |
How do you build a 3-agent pipeline?
Here is a complete pipeline that takes a feature request from research to working code. Save this as .claude/commands/feature.md:
---
description: Build a new feature using research-plan-build pipeline
---

Build the following feature for this project: $ARGUMENTS

Follow this process:

1. First, use an Explore agent to scan the codebase and identify:
   - Existing patterns relevant to this feature
   - Files that will need to be modified
   - Test patterns used in similar features
   Read only the files directly relevant. Max output: 300 words.

2. Based on the exploration results, use a Plan agent to design
   the implementation. The plan must include:
   - Which files to create or modify
   - The data model changes (if any)
   - The API endpoints to add
   - The test cases to write
   Max output: 500 words.

3. Review the plan. If correct, build the feature following it.

4. After building, run the test suite. Fix any failures.

5. Run /project:review on the changes.
Now /project:feature add email notifications when a task is assigned triggers the entire pipeline. One command, three phases, consistent results.
How does the pipeline actually execute?
Here is a real run adding email notifications to a task management API:
Step 1: Explore agent (30 seconds, ~$0.05)
Explore agent returns:
  - src/routes/tasks.ts: CRUD endpoints for tasks
  - src/services/taskService.ts: updateTask changes assigneeId
  - nodemailer in package.json (installed, unused)
  - tests/tasks.test.ts: supertest + vitest pattern
  No existing notification system found.
Step 2: Plan agent (45 seconds, ~$0.08)
Plan agent returns:
  Create: src/services/notificationService.ts
  Create: src/lib/email.ts
  Modify: src/services/taskService.ts (call notification after assignment)
  Add: EMAIL_HOST, EMAIL_PORT to .env.example
  Tests: notificationService.test.ts (mock nodemailer)
Step 3: Build (3-5 minutes, ~$0.30)
The main session creates the files following the plan. Here is what the notification service looks like when it comes out:
// src/services/notificationService.ts
import { sendEmail } from '../lib/email'
import prisma from '../lib/prisma'

export async function notifyAssignee(
  taskId: string,
  assigneeId: string
): Promise<void> {
  const [task, assignee] = await Promise.all([
    prisma.task.findUnique({ where: { id: taskId } }),
    prisma.user.findUnique({ where: { id: assigneeId } }),
  ])
  if (!task || !assignee) return

  await sendEmail({
    to: assignee.email,
    subject: `Task assigned: ${task.title}`,
    body: `You have been assigned "${task.title}".`,
  })
}
Prisma through the service layer. Explicit return type. Error handling follows the project pattern. The CLAUDE.md conventions shaped the output without any extra prompting. Total pipeline cost: under $0.50. Total time: under 10 minutes.
Compare that to doing it manually: switch between files, figure out the architecture, write the code, write the tests, hope you followed the conventions. Same result, three times the time.
What constraints prevent runaway costs?
The $40 mistake taught three lessons:
1. Scope limits. Tell the agent exactly what to look at.
Bad:  "Look at the task-related code"
Good: "Read src/routes/tasks.ts and src/services/taskService.ts only"
The vague version lets the agent decide what is relevant. Agents are generous with their definition of relevant.
2. Output limits. Tell the agent how much to produce.
Bad:  "Summarize what you found"
Good: "Summarize in 200 words or less. List only file paths."
3. Tool restrictions. Not every agent needs every tool.
"Do not use WebFetch or WebSearch. Only read local files."This prevents the agent from going down internet rabbit holes that cost money and time.
How do you run agents in parallel?
Not every pipeline is sequential. Independent tasks can run simultaneously.
Say you want to check a PR for type safety, test coverage, and security. Instead of one agent checking all three, spawn three Explore agents in parallel:
"Spawn three Explore agents in parallel:
 1. Check all new functions for explicit return types
 2. Verify every new function has a corresponding test
 3. Scan for raw SQL, hardcoded secrets, and unvalidated input"
They run concurrently and finish in a third of the time. Rule of thumb: use sequential when step N depends on step N-1. Use parallel when tasks are independent.
What breaks in multi-agent pipelines?
Three failure points, in order of frequency:
The handoff. Agent N’s output does not contain what agent N+1 needs. Fix: be explicit about output format. “Return findings as a numbered list with file paths and line numbers.”
The scope. Agent does too much (my $40 research agent) or too little (prompt does not give enough info). Fix: constrain inputs and verify the agent has access to the files it needs.
The order. A coding agent starts before the plan agent finishes. Fix: agents that depend on other agents’ output must run in foreground (blocking), not background.
What should you actually do?
- If you have never used subagents: start with one Explore agent. Ask it to “list all API endpoints in the project and their HTTP methods.” Watch it scan your route files and return a structured list. That is the foundation.
- If you want a full pipeline: copy the
/project:featurecommand above into your.claude/commands/directory. Test it with a real feature request. Add constraints after the first run based on what went wrong. - If costs are a concern: check your Anthropic dashboard after running pipelines. The research step usually consumes the most tokens. Tighten those constraints first.
bottom_line
- Multi-agent pipelines turn Claude Code from a single assistant into a coordinated team. Explore finds, Plan designs, General-purpose builds.
- Without constraints, agents burn money. Two lines of scope and output limits cut costs by 98% in the $40 example.
- Start with the copy-paste command file. One command, three phases. Iterate the constraints after the first run.
Frequently Asked Questions
How much do Claude Code subagents cost?+
A typical subagent call costs between $0.02 and $0.50 depending on context size and output. An Explore agent reading three files costs about $0.05. A full pipeline with three agents typically runs $0.50 to $2.00 total.
What is the difference between Explore and Plan agents?+
Explore agents are read-only and optimized for fast codebase scanning. Plan agents are also read-only but focused on designing implementation approaches. Neither can edit files. Use Explore to find information, Plan to design solutions.
Do subagents see my conversation history?+
No. Subagents start with a clean context containing only the prompt you give them, your CLAUDE.md, and your memory files. If the agent needs context from your conversation, include it in the prompt explicitly.
More from this Book
You're Using 10% of Claude Code
All 60+ tools inside Claude Code mapped by task type with real call examples. What each one does, when it fires, and how this changes your prompts forever.
from: Master Claude Code: 60 Tools You're Not Using
The CLAUDE.md Setup That 10x's Your Output
Build a production CLAUDE.md that makes Claude Code follow your conventions, enforce your rules, and remember your entire stack. Copy-paste config included.
from: Master Claude Code: 60 Tools You're Not Using
Lock Down Claude Code Before It Costs You
The 7-point safety checklist for Claude Code production use. Copy-paste permission configs, credential scanning hooks, and the layered defense system.
from: Master Claude Code: 60 Tools You're Not Using